David Broom offers a step-by-step guide to networked ground source heat pumps ahead of the introduction of the Future Homes Standard.
The UK heating industry is on the cusp of a huge transition. The Future Homes Standard will ban new gas connections for all newbuild homes, leading to heat pumps becoming the go-to heating and hot water system by the end of the decade. In housing developments, a significant chunk of these will likely be ground source, as part of a networked ground-source heat pump model.
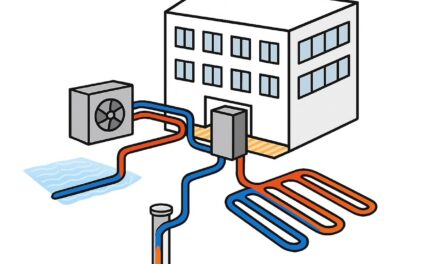
A networked ground source heat pump system isn’t that different to an individual installation – but instead of dealing with one home at a time, multiple homes are connected to a shared underground network of boreholes and pipes, known as the ground array. A water and antifreeze mix circulates through the boreholes, absorbing heat energy from the ground, before transferring it to each property through the pipe network, where a compact ground source heat pump uses it to create heating and hot water.
Installing networked ground source heat pumps in new developments means everything is hidden underground or inside the home with no outdoor kit, and for installers the internal work feels similar to fitting a boiler, but without flues, gas pipes, or carbon monoxide worries.
Step 1: Design and planning
Before anything happens onsite, specialist designers map out the network. When deciding where this goes, they consider the heating and hot water demand for each property, local geology and site conditions, plot layouts and utility trench locations.
While installers don’t usually design the ground array, a basic understanding can make the heat pump installation smoother later. It can also be useful when explaining the systems to customers or conducting future checks and routine maintenance.
Step 2: Borehole drilling
Specialist drilling teams will then drill the boreholes. These are usually 120-200m deep, fitted with HDPE U-tubes, filled with conductive grout, and capped off until the next phase. Drilling normally happens early in the development, alongside other on-site works, with rigs typically drilling 2-2.5 boreholes a week.
Step 3: Trenching and network installation
When trenches are opened for electricity, water, or broadband, the ground source pipework that will connect the heat pumps to the boreholes is laid at the same time. Flow and return pipework connects the boreholes to a subterranean manifold, with flow and return pipes running from the manifolds into each plot.
Step 4: Internal installation
During the second fix stage, M&E contractors will fit the ground source heat pump and connect it up to the home’s wet heating and hot water system. If it’s a Kensa and GTC networked ground source heat pump installation, a compact Shoebox NX heat pump will be fitted alongside the hot water cylinder on the ground floor, usually in a cupboard under the stairs.
The process is designed to be straightforward, with everything sized during the design stage, and the pipework to the ground array already routed to the heat pump’s location.
Step 5: Commissioning and operation
Once installed, each heat pump is commissioned and set to run independently. Commissioning includes checking flow rates and pressures, verifying controls, and confirming the hot water cylinder’s performance. Unlike gas boilers, ground source heat pumps run best at steady, lower flow temperatures, so it’s important to set up the heating distribution system accordingly.
Ground source heat pumps also offer the option of passive cooling, where the naturally cool underground temperatures can be used to bring down the temperature inside the home. This feature, which is increasingly valuable to help developers meet Part O regulations, can be specified at the design stage and only requires some small additional features, such as a cooling module and fan unit.
David Broom is Director of Sales at Kensa